Pre-processing refers to the transformations applied to our data before feeding it to the algorithm. Data Preprocessing is a technique that is used to convert the raw data into a clean data set.
Step 1: Importing the required libraries
Numpy: It is a library that contains Mathematical functions.
Pandas: It is a library used to import and manage datasets.
Step 2: Importing the dataset
Datasets are generally available in .csv format. A CSV file stored tabular data in plain text. We use the read_csv method of the pandas library to read a local CSV file as a DataFrame.
Step 3: Handling the Missing Data
The missing values in the data need to be handled so that it does not reduce the performance of our Machine Learning model. We can replace the missing data by Mean or Median of the entire column. We use the Imputer class of sklearn.preprocessing for this task.
Step 4: Encoding Categorical Data
Categorical data are variables that contain label values rather than numeric values. To achieve this, we import the LabelEncoder class from sklearn.preprocessing library.
Step 5: Splitting the dataset into training and testing
We make two partitions of the dataset, one for training and the model called training set and the other for testing the performance of the trained model called the test set. The split is generally 80/20.
Step 6: Feature Scaling
Most of the Machine Learning algorithms use the Euclidean distance between two data points in their computations, features highly varying in magnitudes. Done by Feature standardization or Z-Score normalization. StandardScaler of sklearn.preprocessing is imported.
if you are someone who is already working in the domain of data and often come across scenarios where you have to use pandas either for your EDA or for performing some sort of analysis. The bottom line is, we all use pandas one way or the other routinely, and why not? After all, it makes life a LOT easier. What if I told you that there is a GUI version for pandas that can make life even better!
Bamboolib is transforming the way we analyze experimental data, allowing everyone on our team to quickly wrangle highly complex datasets in a reproducible manner. Along the way it also teaches best practices to novice coders and avoids wasted time digging through online forums. This is the missing link that we’ve been waiting for to move our analytics workflows out of spreadsheets without sacrificing speed or flexibility.
Getting Started
In this article, we will explore bamboolib and get a deeper insight into its performance.
Disclaimer: a lot can be accomplished via bamboolib but I’ll only be covering some of its salient features to make you understand what this library is in a nutshell.
In order to get started with bamboolib, all you need is a good old-fashioned PIP command to install it. Open terminal or Jupyter notebook and type:
pip install bamboolib
Importing the library and getting started with it
In order to use bamboolib import the library as:
import bamboolib as bam
and you’re done! Now load the data as you normally would with pandas and once the data is loaded (assuming you’ve loaded the CSV in a variable called data) all you have to do in order to get started with bamboo lib is as simple as typing:
bam.show(data)
For purpose of a demo, I have done the process on the publicly available data of properties provided by zameen.com. The initial show command will reveal something like this:
As you can see, this is just the initial data frame shown. Here we have two options; either we can create a plot feature in bamboolib which will help us to create various plots over our data frame OR we can choose to go with Explore DataFrame for EDA.
Create Plot
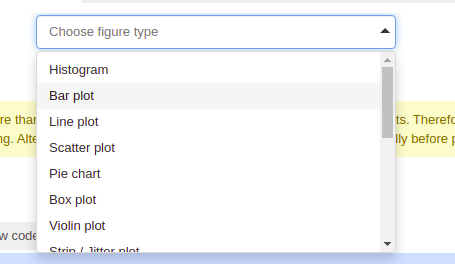
The create plot feature is one of the most amazing features of bamboolib. It allows you to create one of many plots with just a few clicks. Let’s see how easily this can be done. As soon as we click on create plot we get multiple options for graphs. These graphs are not only limited to conventional 2D graphs but also allow us to use 3D graphs. Below are a few of the options for graphs:
Let’s say we want to create a graph to see the comparison between prices of property between different areas of Islamabad.
It is as simple as selecting “Figure Type” which I have selected as a bar graph, selecting column names for the x and y-axis which I have selected as area and price respectively and that’s pretty much it. Bamboolib does all the work for you.
It even allows you to choose different themes for your plot, scaling factor, log scaling, color themes, order of columns, and opacity, etc.
Impressed yet? Bamboolib even lets you copy the code for your plots by a simple click on the copy code button using which you can even create these beautiful visuals outside your Jupyter notebook.
Wait, there’s more. Here comes bamboolib once again, since the majority of its graphs utilize Plotly, all the graphs created are interactive and you can even create a hover show of data on the graphs. It also allows you to directly save the graph as a png with a single click.
EDA
Now let’s just say that you are not interested in the visuals and are more interested in knowing what kind of data and features that you actually have. No worries, bamboolib got you. This is what you get with a single click on “Explore DataFrame”. Your entire data is explained as you’ve never seen before.
It tells you all the data types along with missing values, percentage of missing values so you can decide for yourself to see if you need to impute the data or drop the column or do whatever you see fit with the data. It also lets you know the unique values in each of the features of your data.
Want to know about just a single feature? Start by checking out the property types in the data. Simply click on the column named property_type or select from the drop-down on top. You’ll get the following results:
Not only does it tell you the unique and missing values but also helps you find the distribution of data along with the percentage of presence of the unique values in that specific column. This also helps you see the count and cumulative percentages. Still not impressed?
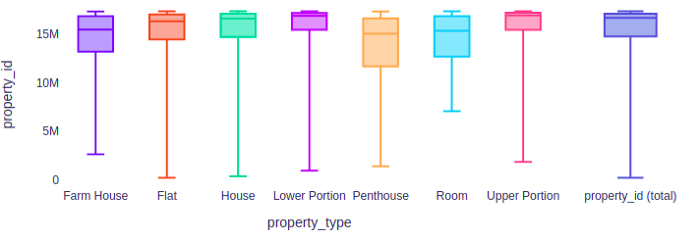
Let’s dive deeper into the selected column, if you click on “Bivariate plots” it’ll show you just what you need to know regarding the distribution of your data. The box plots visually explain the distribution of all the values of your column.
You can even set some predictors here to see how well a column helps to predict another one as a target. In my case, this might not be a good example because of a lot of categorical values but still, I’ll show you the screenshot. Notice that it also indicates the MAE:
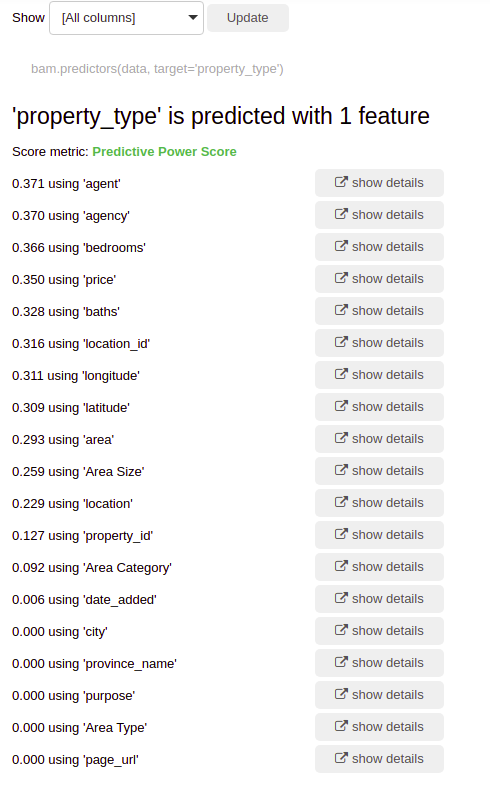
And this doesn’t stop here, we can actually go a step further to see which features help us to predict our current feature and how much they contribute to this:
We can see the details of each to verify for ourselves as I have for the area category.
Correlation Matrix
Last but not the least, bamboolib also enables you to see a correlation between the features using the correlation matrix it generates with a single click:
Conclusion
I might have missed a lot of things but I have covered enough for you to get intrigued and explore on your own. If you find interesting use of the library do write an article and share it with me.
Libraries like bamboolib save a lot of time and make our work a lot easier but still in order to utilize such powerful tools make sure that you have enough baseline knowledge to understand what each graph and stats mean. These tools are brilliant but only when you have got your basics covered and concepts right. For someone who has a strong grip on EDA, you’ll love this.
A data science model development pipeline involves various components including data collection, data processing, Exploratory data analysis, modeling, and deployment. Before training a machine learning or deep learning model, it’s essential to clean or process the dataset and fit it for training. Processes like handling missing records, removing redundant features, and feature analysis are part of the data processing component.
Often, these processes are repetitive and involve most of the model development work time. Various open-sourced Auto-ML libraries automate the entire pipeline in few lines of Python code, but most of them behave as a black-box and do not give intuition about how they processed the dataset.
To overcome this problem, we have an open-sourced Python library called dabl — data analysis baseline library, that can automate most of the parts of the machine learning model development pipeline. This article will cover the hands-on implementation of the package dabl including data preprocessing, feature visualization, and analysis, followed by modeling.
dabl:
dabl is a data analysis baseline library that makes supervised machine learning modeling easier and accessible for beginners or folks with no knowledge of data science. dabl is inspired by the Scikit-learn library and it tries to democratize machine learning modeling by reducing the boilerplate task and automating the components.
dabl library includes various features that make it easier to process, analyze and model the data in a few lines of Python code.
Getting Started:
dabl can be installed from PyPI using
pip install dabl
We will be using the Titanic dataset downloaded from Kaggle for implementation of the library.
(1.) Data Pre-processing:
dabl automates the data preprocessing pipeline in a few lines of Python code. The pre-processing steps performed by dabl include identifying missing values, removing the redundant features, and understanding the features’ datatypes to further perform feature engineering.
The list of detected feature types by dabl includes:
The list of detected feature types by dabl includes:
1. continuous
2. categorical
3. date
4. Dirty_float
5. Low_card_int
6. free_string
7. Useless
All the dataset features are automatically categorized into the above-mentioned datatypes by dabl using a single line of Python code.
df_clean = dabl.clean(df, verbose=1)
(Image by Author), Auto-detected data types for each feature
The raw Titanic dataset has 12 features, and they are automatically categorized into the above-mentioned datatypes by dabl for further feature engineering. dabl also provides capabilities to change the data type of any feature based on requirements.
One can have a look at the assigned datatype for each feature using detect_types() function.
(2.) Exploratory Data Analysis:
EDA is an essential component of the data science model development life cycle. Seaborn, Matplotlib, etc are popular libraries to perform various analyses to get a better understanding of the dataset. dabl makes the EDA very simple and saves worktime.
dabl.plot(df_clean, target_col="Survived")
plot()function in dabl can feature visualization by plotting various plots including:
Bar plot for target distribution
Scatter Pair plots
Linear Discriminant Analysis
dabl automatically performs PCA on the dataset and also shows the discriminant PCA graph for all the features in the dataset. It also displays the variance preserved by applying PCA.
(3.) Modeling:
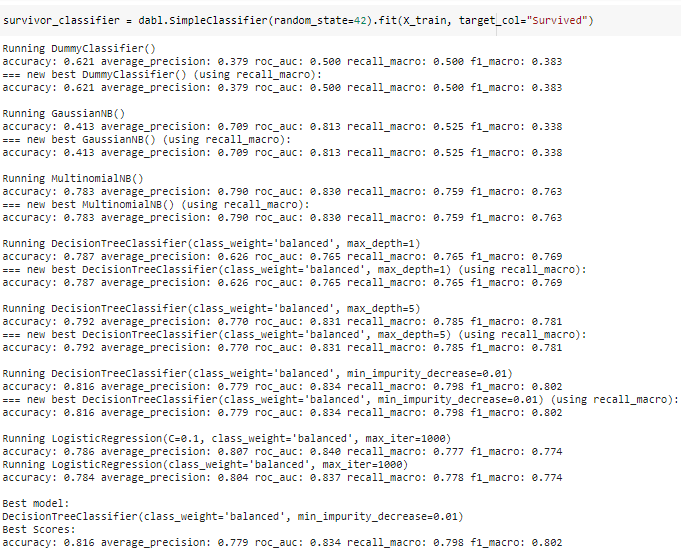
dabl speeds up the modeling workflow by training various baseline machine learning algorithms on the training data and returns with the best-performing model. dabl makes simple assumptions and generates metrics for baseline models.
Modeling can be performed in 1 line of code using SimpleClassifier() function in dabl.
(Image by Author), Performance metrics for baseline modeling using dabl
dabl returns with the best model (Decision Tree Classifier) in almost no time. dabl is a recently developed library and provides basic methods for model training.
Conclusion:
Dabl is a handy tool that makes supervised machine learning more accessible and fast. It simplifies data cleaning, feature visualization, and developing baseline models in a few lines of Python code. dabl is a recently developed library and needs a lot of improvement, and it’s not recommended for production use.