Finally, a real alternative to investing in the stock market
Invest in private market real estate – the piece of your portfolio you didn’t even know was missing.
Traditiona lportfolio theory70% stocks30% bondsModer nportfolio theory~30% of your assets allocated to private market real estate
For years, individuals have been limited to investing in public stocks and bonds. Now, for the first time ever, you can invest like a billion-dollar institution by diversifying into private market real estate investments.
Now you can invest the way the most successful institutions do.
Institutional investors have consistently outperformed public markets over the last 20 years by investing in alternative assets like private market real estate. Fundrise democratizes access to this once-unattainable asset class, making it possible for anyone to become a real estate investor regardless of income or net worth.
Looking for better returns? Then stop paying for something you don’t use.
Public marketWhen you invest in the stock market, you or your investment advisor buys shares in an auction environment where prices are heavily bid up.vs
Private marketWhen you invest with Fundrise, you’re investing in private real estate that we purchase through a negotiated sale to keep prices low.
Investment HorizonDaily liquidity
Investment Horizon3 – 7 years
Trailing 20 yr. annual return8.2%
Trailing 20 yr. annual return12.3%
Cost of auction liquidity33%
Auction liquidity costs you 33% of your return – whether or not you use it.
We actively identify, acquire and improve real estate on your behalf.
We follow a value investing strategy of buying investments for less than what we believe is their replacement cost, then improving the real estate through hands-on management and partnership with local operators. Our team draws on over 75 years and $7.5 billion of combined experience to pursue the best results for our investors.
Pictured: Elysium 14, a Fundrise asset in Washington, DCDiversification
Make a single investment and get diversified across dozens of individual real estate assets.
Every Fundrise portfolio is made up of our proprietary eDirect™ investments – think of them as online-only, low-cost ETFs for real estate. Each eDirect investment acquires and manages many individual real estate properties, which means you get broad diversification with the click of a button.
Top Questions
What am I investing in?
You are investing in a diversified portfolio of real estate projects located throughout the United States that our team identifies, acquires, and manages on your behalf. The approximate current allocation is displayed in the Portfolio section above. However, you should expect it to grow and change over time as we acquire more projects, and others are sold or pay off.
How do I earn returns from this investment?
You earn returns primarily in two ways: (A) via quarterly dividends and (B) via appreciation in the value of the shares of your investment. These returns ultimately come from the individual real estate assets in your portfolio – interest or rental income collected, as well as potential appreciation in the property’s value. As a shareholder, you are entitled to your pro-rata portion of any returns. Actual results may vary and there can be no guarantee of enhanced returns due to investing on Fundrise or the use of Fundrise Advisors’ services.
When can I expect a return?
Dividends are typically distributed in the middle of the month following the end of each quarter, e.g. mid-April for dividends earned during the first quarter. You may also receive additional periodic cash distributions as certain underlying properties are sold. The value of your shares is also typically re-calculated on a quarterly or semi-annual basis.
Can I redeem (cash out) my shares?
Real estate is inherently a long-term, illiquid investment. Fundrise is intended for investors who have a minimum time horizon of approximately five years. However, we have adopted a redemption plan whereby an investor may obtain liquidity quarterly for the eREITs, or monthly after a minimum 60-day waiting period for the eFunds, subject to certain limitations. For more information, please see the offering circulars.
What are the fees?
Projected return and dividend figures displayed on this page are net of fees. The offerings in this plan pay a 0.85% annual asset management fee. In addition, investors pay a 0.15% annual investment advisory fee, which may be waived under certain circumstances. This all-in 1% annual pricing model is up to 40% more cost-efficient than publicly available investments. For a full description of the fees that each investment may incur, please see the offering circulars.
What are eREITs and eFunds?
eREITs and eFunds are the limited liability companies that hold the real estate projects in your Fundrise portfolio. When you invest, you are actually buying shares of these companies, allowing you to diversify into many properties efficiently and at a low cost. The current weighting of eREITs and eFunds in this plan is listed below.
Simple Mail Transfer Protocol (SMTP) is a protocol, which handles sending e-mail and routing e-mail between mail servers.
Python provides smtplib module, which defines an SMTP client session object that can be used to send mail to any Internet machine with an SMTP or ESMTP listener daemon
host − This is the host running your SMTP server. You can specify IP address of the host or a domain name like tutorialspoint.com. This is optional argument.
port − If you are providing host argument, then you need to specify a port, where SMTP server is listening. Usually this port would be 25.
local_hostname − If your SMTP server is running on your local machine, then you can specify just localhost as of this option.
An SMTP object has an instance method called sendmail, which is typically used to do the work of mailing a message. It takes three parameters −
The sender − A string with the address of the sender.
The receivers − A list of strings, one for each recipient.
The message − A message as a string formatted as specified in the various RFCs.
#!/usr/bin/python

import smtplib

sender = 'from@fromdomain.com'
receivers = ['to@todomain.com']

message = """From: From Person <from@fromdomain.com>
To: To Person <to@todomain.com>
Subject: SMTP e-mail test

This is a test e-mail message.
"""

try:
   smtpObj = smtplib.SMTP('localhost')
   smtpObj.sendmail(sender, receivers, message)
   print "Successfully sent email"
except SMTPException:
   print "Error: unable to send email"
A basic email in message with From,To, and Subject header separated from the body of email with blank line.
To send the mail you use smtpObj to connect to the SMTP server on the local machine and then use the sendmailmethod along with the message, the from address, and the destination address as parameters (even though the from and to addresses are within the e-mail itself, these aren’t always used to route mail).
f you are not running an SMTP server on your local machine, you can use smtplib client to communicate with a remote SMTP server. Unless you are using a webmail service (such as Hotmail or Yahoo! Mail), your e-mail provider must have provided you with outgoing mail server details that you can supply them, as follows −
smtplib.SMTP('mail.your-domain.com', 25)
Sending an HTML e-mail using Python
When you send a text message using Python, then all the content are treated as simple text. Even if you include HTML tags in a text message, it is displayed as simple text and HTML tags will not be formatted according to HTML syntax. But Python provides option to send an HTML message as actual HTML message.
While sending an e-mail message, you can specify a Mime version, content type and character set to send an HTML e-mail.
Following is the example to send HTML content as an e-mail. Try it once −
#!/usr/bin/python

import smtplib

message = """From: From Person <from@fromdomain.com>
To: To Person <to@todomain.com>
MIME-Version: 1.0
Content-type: text/html
Subject: SMTP HTML e-mail test

This is an e-mail message to be sent in HTML format

<b>This is HTML message.</b>
<h1>This is headline.</h1>
"""

try:
   smtpObj = smtplib.SMTP('localhost')
   smtpObj.sendmail(sender, receivers, message)
   print "Successfully sent email"
except SMTPException:
   print "Error: unable to send email"
Sending Attachments as an E-mail
To send an e-mail with mixed content requires to set Content-type header to multipart/mixed. Then, text and attachment sections can be specified within boundaries.
A boundary is started with two hyphens followed by a unique number, which cannot appear in the message part of the e-mail. A final boundary denoting the e-mail’s final section must also end with two hyphens.
Attached files should be encoded with the pack(“m”) function to have base64 encoding before transmission.
Example
Following is the example, which sends a file /tmp/test.txt as an attachment. Try it once −
#!/usr/bin/python

import smtplib
import base64

filename = "/tmp/test.txt"

# Read a file and encode it into base64 format
fo = open(filename, "rb")
filecontent = fo.read()
encodedcontent = base64.b64encode(filecontent)  # base64

sender = 'webmaster@tutorialpoint.com'
reciever = 'amrood.admin@gmail.com'

marker = "AUNIQUEMARKER"

body ="""
This is a test email to send an attachement.
"""
# Define the main headers.
part1 = """From: From Person <me@fromdomain.net>
To: To Person <amrood.admin@gmail.com>
Subject: Sending Attachement
MIME-Version: 1.0
Content-Type: multipart/mixed; boundary=%s
--%s
""" % (marker, marker)

# Define the message action
part2 = """Content-Type: text/plain
Content-Transfer-Encoding:8bit

%s
--%s
""" % (body,marker)

# Define the attachment section
part3 = """Content-Type: multipart/mixed; name=\"%s\"
Content-Transfer-Encoding:base64
Content-Disposition: attachment; filename=%s

%s
--%s--
""" %(filename, filename, encodedcontent, marker)
message = part1 + part2 + part3

try:
   smtpObj = smtplib.SMTP('localhost')
   smtpObj.sendmail(sender, reciever, message)
   print "Successfully sent email"
except Exception:
   print "Error: unable to send email"
Python provides two levels of access to network services which allows you to implement clients and servers for both connection-oriented and connectionless protocols.Python also has libraries that provide higher-level access to specific application-level network protocols, such as FTP, HTTP, and so on.
Sockets are the endpoints of a bidirectional communications channel. Sockets may communicate within a process, between processes on the same machine, or between processes on different continents.
Sockets may be implemented over a number of different channel types: Unix domain sockets, TCP, UDP, and so on. The socket library provides specific classes for handling the common transports as well as a generic interface for handling the rest.
Sockets have their own vocabulary −
Sr.No.
Term & Description
1
DomainThe family of protocols that is used as the transport mechanism. These values are constants such as AF_INET, PF_INET, PF_UNIX, PF_X25, and so on.
2
typeThe type of communications between the two endpoints, typically SOCK_STREAM for connection-oriented protocols and SOCK_DGRAM for connectionless protocols.
3
protocolTypically zero, this may be used to identify a variant of a protocol within a domain and type.
4
hostnameThe identifier of a network interface −A string, which can be a host name, a dotted-quad address, or an IPV6 address in colon (and possibly dot) notationA string “<broadcast>”, which specifies an INADDR_BROADCAST address.A zero-length string, which specifies INADDR_ANY, orAn Integer, interpreted as a binary address in host byte order.
5
portEach server listens for clients calling on one or more ports. A port may be a Fixnum port number, a string containing a port number, or the name of a service.
The socket Module
To create a socket, you must use the socket.socket() function available in socket module, which has the general syntax −
s = socket.socket (socket_family, socket_type, protocol=0)
Here is the description of the parameters −
socket_family − This is either AF_UNIX or AF_INET, as explained earlier.
socket_type − This is either SOCK_STREAM or SOCK_DGRAM.
protocol − This is usually left out, defaulting to 0.
Once you have socket object, then you can use required functions to create your client or server program. Following is the list of functions required −
Server Socket Methods
Sr.No.
Method & Description
1
s.bind()This method binds address (hostname, port number pair) to socket.
2
s.listen()This method sets up and start TCP listener.
s.connect()This method actively initiates TCP server connection.
General Socket Methods
Sr.No.
Method & Description
1
s.recv()This method receives TCP message
2
s.send()This method transmits TCP message
3
s.recvfrom()This method receives UDP message
4
s.sendto()This method transmits UDP message
5
s.close()This method closes socket
6
socket.gethostname()Returns the hostname.
A Simple Server
To write Internet servers, we use the socket function available in socket module to create a socket object. A socket object is then used to call other functions to setup a socket server.
Now call bind(hostname, port) function to specify a port for your service on the given host.
Next, call the accept method of the returned object. This method waits until a client connects to the port you specified, and then returns a connection object that represents the connection to that client.
#!/usr/bin/python           # This is server.py file

import socket               # Import socket module

s = socket.socket()         # Create a socket object
host = socket.gethostname() # Get local machine name
port = 12345                # Reserve a port for your service.
s.bind((host, port))        # Bind to the port

s.listen(5)                 # Now wait for client connection.
while True:
   c, addr = s.accept()     # Establish connection with client.
   print 'Got connection from', addr
   c.send('Thank you for connecting')
   c.close()                # Close the connection
A Simple Client
Let us write a very simple client program which opens a connection to a given port 12345 and given host. This is very simple to create a socket client using Python’s socket module function.
The socket.connect(hosname, port ) opens a TCP connection to hostname on the port. Once you have a socket open, you can read from it like any IO object. When done, remember to close it, as you would close a file.
The following code is a very simple client that connects to a given host and port, reads any available data from the socket, and then exits −
#!/usr/bin/python           # This is client.py file

import socket               # Import socket module

s = socket.socket()         # Create a socket object
host = socket.gethostname() # Get local machine name
port = 12345                # Reserve a port for your service.

s.connect((host, port))
print s.recv(1024)
s.close()                     # Close the socket when done
Now run this server.py in background and then run above client.py to see the result.
# Following would start a server in background.
$ python server.py &

# Once server is started run client as follows:
$ python client.py
This would produce following result −
Got connection from ('127.0.0.1', 48437)
Thank you for connecting
Python Internet modules
A list of some important modules in Python Network/Internet programming.
Protocol
Common function
Port No
Python module
HTTP
Web pages
80
httplib, urllib, xmlrpclib
NNTP
Usenet news
119
nntplib
FTP
File transfers
20
ftplib, urllib
SMTP
Sending email
25
smtplib
POP3
Fetching email
110
poplib
IMAP4
Fetching email
143
imaplib
Telnet
Command lines
23
telnetlib
Gopher
Document transfers
70
gopherlib, urllib
Please check all the libraries mentioned above to work with FTP, SMTP, POP, and IMAP protocols.
Further Readings
This was a quick start with Socket Programming. It is a vast subject. It is recommended to go through the following link to find more detail −
The Common Gateway Interface, or CGI, is a standard for external gateway programs to interface with information servers such as HTTP servers.
The current version is CGI/1.1 and CGI/1.2 is under progress.
Web Browsing
To understand the concept of CGI, let us see what happens when we click a hyper link to browse a particular web page or URL.
Your browser contacts the HTTP web server and demands for the URL, i.e., filename.
Web Server parses the URL and looks for the filename. If it finds that file then sends it back to the browser, otherwise sends an error message indicating that you requested a wrong file.
Web browser takes response from web server and displays either the received file or error message.
However, it is possible to set up the HTTP server so that whenever a file in a certain directory is requested that file is not sent back; instead it is executed as a program, and whatever that program outputs is sent back for your browser to display. This function is called the Common Gateway Interface or CGI and the programs are called CGI scripts. These CGI programs can be a Python Script, PERL Script, Shell Script, C or C++ program, etc.
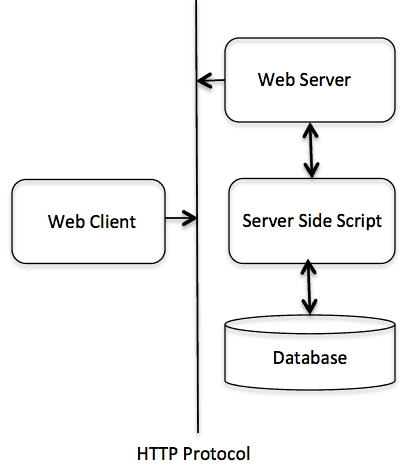
CGI Architecture Diagram
Web Server Support and Configuration
Before you proceed with CGI Programming, make sure that your Web Server supports CGI and it is configured to handle CGI Programs. All the CGI Programs to be executed by the HTTP server are kept in a pre-configured directory. This directory is called CGI Directory and by convention it is named as /var/www/cgi-bin. By convention, CGI files have extension as. cgi, but you can keep your files with python extension .py as well.
By default, the Linux server is configured to run only the scripts in the cgi-bin directory in /var/www. If you want to specify any other directory to run your CGI scripts, comment the following lines in the httpd.conf file −
<Directory "/var/www/cgi-bin">
   AllowOverride None
   Options ExecCGI
   Order allow,deny
   Allow from all
</Directory>

<Directory "/var/www/cgi-bin">
Options All
</Directory>
Here, we assume that you have Web Server up and running successfully and you are able to run any other CGI program like Perl or Shell, etc.
First CGI Program
Here is a simple link, which is linked to a CGI script called hello.py. This file is kept in /var/www/cgi-bin directory and it has following content. Before running your CGI program, make sure you have change mode of file using chmod 755 hello.py UNIX command to make file executable.
#!/usr/bin/python

print "Content-type:text/html\r\n\r\n"
print '<html>'
print '<head>'
print '<title>Hello Word - First CGI Program</title>'
print '</head>'
print '<body>'
print '<h2>Hello Word! This is my first CGI program</h2>'
print '</body>'
print '</html>'
If you click hello.py, then this produces the following output −
Hello Word! This is my first CGI program
This hello.py script is a simple Python script, which writes its output on STDOUT file, i.e., screen. There is one important and extra feature available which is first line to be printed Content-type:text/html\r\n\r\n. This line is sent back to the browser and it specifies the content type to be displayed on the browser screen.
By now you must have understood basic concept of CGI and you can write many complicated CGI programs using Python. This script can interact with any other external system also to exchange information such as RDBMS.
HTTP Header
The line Content-type:text/html\r\n\r\n is part of HTTP header which is sent to the browser to understand the content. All the HTTP header will be in the following form −
HTTP Field Name: Field Content

For Example
Content-type: text/html\r\n\r\n
There are few other important HTTP headers, which you will use frequently in your CGI Programming.
Sr.No.
Header & Description
1
Content-type:A MIME string defining the format of the file being returned. Example is Content-type:text/html
2
Expires: DateThe date the information becomes invalid. It is used by the browser to decide when a page needs to be refreshed. A valid date string is in the format 01 Jan 1998 12:00:00 GMT.
3
Location: URLThe URL that is returned instead of the URL requested. You can use this field to redirect a request to any file.
4
Last-modified: DateThe date of last modification of the resource.
5
Content-length: NThe length, in bytes, of the data being returned. The browser uses this value to report the estimated download time for a file.
6
Set-Cookie: StringSet the cookie passed through the string
CGI Environment Variables
All the CGI programs have access to the following environment variables. These variables play an important role while writing any CGI program.
Sr.No.
Variable Name & Description
1
CONTENT_TYPEThe data type of the content. Used when the client is sending attached content to the server. For example, file upload.
2
CONTENT_LENGTHThe length of the query information. It is available only for POST requests.
3
HTTP_COOKIEReturns the set cookies in the form of key & value pair.
4
HTTP_USER_AGENTThe User-Agent request-header field contains information about the user agent originating the request. It is name of the web browser.
5
PATH_INFOThe path for the CGI script.
6
QUERY_STRINGThe URL-encoded information that is sent with GET method request.
7
REMOTE_ADDRThe IP address of the remote host making the request. This is useful logging or for authentication.
8
REMOTE_HOSTThe fully qualified name of the host making the request. If this information is not available, then REMOTE_ADDR can be used to get IR address.
9
REQUEST_METHODThe method used to make the request. The most common methods are GET and POST.
10
SCRIPT_FILENAMEThe full path to the CGI script.
11
SCRIPT_NAMEThe name of the CGI script.
12
SERVER_NAMEThe server’s hostname or IP Address
13
SERVER_SOFTWAREThe name and version of the software the server is running.
Here is small CGI program to list out all the CGI variables. Click this link to see the result Get Environment
#!/usr/bin/python

import os

print "Content-type: text/html\r\n\r\n";
print "<font size=+1>Environment</font><\br>";
for param in os.environ.keys():
   print "<b>%20s</b>: %s<\br>" % (param, os.environ[param])
GET and POST Methods
You must have come across many situations when you need to pass some information from your browser to web server and ultimately to your CGI Program. Most frequently, browser uses two methods two pass this information to web server. These methods are GET Method and POST Method.
Passing Information using GET method
The GET method sends the encoded user information appended to the page request. The page and the encoded information are separated by the ? character as follows −
The GET method is the default method to pass information from browser to web server and it produces a long string that appears in your browser’s Location:box. Never use GET method if you have password or other sensitive information to pass to the server. The GET method has size limitation: only 1024 characters can be sent in a request string. The GET method sends information using QUERY_STRING header and will be accessible in your CGI Program through QUERY_STRING environment variable.
You can pass information by simply concatenating key and value pairs along with any URL or you can use HTML <FORM> tags to pass information using GET method.
Below is hello_get.py script to handle input given by web browser. We are going to use cgi module, which makes it very easy to access passed information −
#!/usr/bin/python

# Import modules for CGI handling
import cgi, cgitb

# Create instance of FieldStorage
form = cgi.FieldStorage()

# Get data from fields
first_name = form.getvalue('first_name')
last_name  = form.getvalue('last_name')

print "Content-type:text/html\r\n\r\n"
print "<html>"
print "<head>"
print "<title>Hello - Second CGI Program</title>"
print "</head>"
print "<body>"
print "<h2>Hello %s %s</h2>" % (first_name, last_name)
print "</body>"
print "</html>"
This would generate the following result −
Hello ZARA ALI
Simple FORM Example:GET Method
This example passes two values using HTML FORM and submit button. We use same CGI script hello_get.py to handle this input.
<form action = "/cgi-bin/hello_get.py" method = "get">
First Name: <input type = "text" name = "first_name">  <br />

Last Name: <input type = "text" name = "last_name" />
<input type = "submit" value = "Submit" />
</form>
Here is the actual output of the above form, you enter First and Last Name and then click submit button to see the result.First Name: Last Name:
Passing Information Using POST Method
A generally more reliable method of passing information to a CGI program is the POST method. This packages the information in exactly the same way as GET methods, but instead of sending it as a text string after a ? in the URL it sends it as a separate message. This message comes into the CGI script in the form of the standard input.
Below is same hello_get.py script which handles GET as well as POST method.
#!/usr/bin/python

# Import modules for CGI handling
import cgi, cgitb

# Create instance of FieldStorage
form = cgi.FieldStorage()

# Get data from fields
first_name = form.getvalue('first_name')
last_name  = form.getvalue('last_name')

print "Content-type:text/html\r\n\r\n"
print "<html>"
print "<head>"
print "<title>Hello - Second CGI Program</title>"
print "</head>"
print "<body>"
print "<h2>Hello %s %s</h2>" % (first_name, last_name)
print "</body>"
print "</html>"
Let us take again same example as above which passes two values using HTML FORM and submit button. We use same CGI script hello_get.py to handle this input.
<form action = "/cgi-bin/hello_get.py" method = "post">
First Name: <input type = "text" name = "first_name"><br />
Last Name: <input type = "text" name = "last_name" />

<input type = "submit" value = "Submit" />
</form>
Here is the actual output of the above form. You enter First and Last Name and then click submit button to see the result.First Name: Last Name:
Passing Checkbox Data to CGI Program
Checkboxes are used when more than one option is required to be selected.
Here is example HTML code for a form with two checkboxes −
<form action = "/cgi-bin/checkbox.cgi" method = "POST" target = "_blank">
<input type = "checkbox" name = "maths" value = "on" /> Maths
<input type = "checkbox" name = "physics" value = "on" /> Physics
<input type = "submit" value = "Select Subject" />
</form>
The result of this code is the following form − Maths Physics
Below is checkbox.cgi script to handle input given by web browser for checkbox button.
#!/usr/bin/python

# Import modules for CGI handling
import cgi, cgitb

# Create instance of FieldStorage
form = cgi.FieldStorage()

# Get data from fields
if form.getvalue('maths'):
   math_flag = "ON"
else:
   math_flag = "OFF"

if form.getvalue('physics'):
   physics_flag = "ON"
else:
   physics_flag = "OFF"

print "Content-type:text/html\r\n\r\n"
print "<html>"
print "<head>"
print "<title>Checkbox - Third CGI Program</title>"
print "</head>"
print "<body>"
print "<h2> CheckBox Maths is : %s</h2>" % math_flag
print "<h2> CheckBox Physics is : %s</h2>" % physics_flag
print "</body>"
print "</html>"
Passing Radio Button Data to CGI Program
Radio Buttons are used when only one option is required to be selected.
Here is example HTML code for a form with two radio buttons −
<form action = "/cgi-bin/radiobutton.py" method = "post" target = "_blank">
<input type = "radio" name = "subject" value = "maths" /> Maths
<input type = "radio" name = "subject" value = "physics" /> Physics
<input type = "submit" value = "Select Subject" />
</form>
The result of this code is the following form − Maths Physics
Below is radiobutton.py script to handle input given by web browser for radio button −
#!/usr/bin/python

# Import modules for CGI handling
import cgi, cgitb

# Create instance of FieldStorage
form = cgi.FieldStorage()

# Get data from fields
if form.getvalue('subject'):
   subject = form.getvalue('subject')
else:
   subject = "Not set"

print "Content-type:text/html\r\n\r\n"
print "<html>"
print "<head>"
print "<title>Radio - Fourth CGI Program</title>"
print "</head>"
print "<body>"
print "<h2> Selected Subject is %s</h2>" % subject
print "</body>"
print "</html>"
Passing Text Area Data to CGI Program
TEXTAREA element is used when multiline text has to be passed to the CGI Program.
Here is example HTML code for a form with a TEXTAREA box −
<form action = "/cgi-bin/textarea.py" method = "post" target = "_blank">
<textarea name = "textcontent" cols = "40" rows = "4">
Type your text here...
</textarea>
<input type = "submit" value = "Submit" />
</form>
The result of this code is the following form −
Below is textarea.cgi script to handle input given by web browser −
#!/usr/bin/python

# Import modules for CGI handling
import cgi, cgitb

# Create instance of FieldStorage
form = cgi.FieldStorage()

# Get data from fields
if form.getvalue('textcontent'):
   text_content = form.getvalue('textcontent')
else:
   text_content = "Not entered"

print "Content-type:text/html\r\n\r\n"
print "<html>"
print "<head>";
print "<title>Text Area - Fifth CGI Program</title>"
print "</head>"
print "<body>"
print "<h2> Entered Text Content is %s</h2>" % text_content
print "</body>"
Passing Drop Down Box Data to CGI Program
Drop Down Box is used when we have many options available but only one or two will be selected.
Here is example HTML code for a form with one drop down box −
<form action = "/cgi-bin/dropdown.py" method = "post" target = "_blank">
<select name = "dropdown">
<option value = "Maths" selected>Maths</option>
<option value = "Physics">Physics</option>
</select>
<input type = "submit" value = "Submit"/>
</form>
The result of this code is the following form − Maths Physics
Below is dropdown.py script to handle input given by web browser.
#!/usr/bin/python

# Import modules for CGI handling
import cgi, cgitb

# Create instance of FieldStorage
form = cgi.FieldStorage()

# Get data from fields
if form.getvalue('dropdown'):
   subject = form.getvalue('dropdown')
else:
   subject = "Not entered"

print "Content-type:text/html\r\n\r\n"
print "<html>"
print "<head>"
print "<title>Dropdown Box - Sixth CGI Program</title>"
print "</head>"
print "<body>"
print "<h2> Selected Subject is %s</h2>" % subject
print "</body>"
print "</html>"
Using Cookies in CGI
HTTP protocol is a stateless protocol. For a commercial website, it is required to maintain session information among different pages. For example, one user registration ends after completing many pages. How to maintain user’s session information across all the web pages?
In many situations, using cookies is the most efficient method of remembering and tracking preferences, purchases, commissions, and other information required for better visitor experience or site statistics.
How It Works?
Your server sends some data to the visitor’s browser in the form of a cookie. The browser may accept the cookie. If it does, it is stored as a plain text record on the visitor’s hard drive. Now, when the visitor arrives at another page on your site, the cookie is available for retrieval. Once retrieved, your server knows/remembers what was stored.
Cookies are a plain text data record of 5 variable-length fields −
Expires − The date the cookie will expire. If this is blank, the cookie will expire when the visitor quits the browser.
Domain − The domain name of your site.
Path − The path to the directory or web page that sets the cookie. This may be blank if you want to retrieve the cookie from any directory or page.
Secure − If this field contains the word “secure”, then the cookie may only be retrieved with a secure server. If this field is blank, no such restriction exists.
Name=Value − Cookies are set and retrieved in the form of key and value pairs.
Setting up Cookies
It is very easy to send cookies to browser. These cookies are sent along with HTTP Header before to Content-type field. Assuming you want to set UserID and Password as cookies. Setting the cookies is done as follows −
From this example, you must have understood how to set cookies. We use Set-Cookie HTTP header to set cookies.
It is optional to set cookies attributes like Expires, Domain, and Path. It is notable that cookies are set before sending magic line “Content-type:text/html\r\n\r\n.
Retrieving Cookies
It is very easy to retrieve all the set cookies. Cookies are stored in CGI environment variable HTTP_COOKIE and they will have following form −
key1 = value1;key2 = value2;key3 = value3....
Here is an example of how to retrieve cookies.
#!/usr/bin/python

# Import modules for CGI handling
from os import environ
import cgi, cgitb

if environ.has_key('HTTP_COOKIE'):
   for cookie in map(strip, split(environ['HTTP_COOKIE'], ';')):
      (key, value ) = split(cookie, '=');
      if key == "UserID":
         user_id = value

      if key == "Password":
         password = value

print "User ID  = %s" % user_id
print "Password = %s" % password
This produces the following result for the cookies set by above script −
User ID = XYZ
Password = XYZ123
File Upload Example
To upload a file, the HTML form must have the enctype attribute set to multipart/form-data. The input tag with the file type creates a “Browse” button.
<html>
<body>
   <form enctype = "multipart/form-data"
                     action = "save_file.py" method = "post">
   <p>File: <input type = "file" name = "filename" /></p>
   <p><input type = "submit" value = "Upload" /></p>
   </form>
</body>
</html>
The result of this code is the following form −
File:
Above example has been disabled intentionally to save people uploading file on our server, but you can try above code with your server.
Here is the script save_file.py to handle file upload −
#!/usr/bin/python

import cgi, os
import cgitb; cgitb.enable()

form = cgi.FieldStorage()

# Get filename here.
fileitem = form['filename']

# Test if the file was uploaded
if fileitem.filename:
   # strip leading path from file name to avoid
   # directory traversal attacks
   fn = os.path.basename(fileitem.filename)
   open('/tmp/' + fn, 'wb').write(fileitem.file.read())

   message = 'The file "' + fn + '" was uploaded successfully'

else:
   message = 'No file was uploaded'

print """\
Content-Type: text/html\n
<html>
<body>
   <p>%s</p>
</body>
</html>
""" % (message,)
If you run the above script on Unix/Linux, then you need to take care of replacing file separator as follows, otherwise on your windows machine above open() statement should work fine.
Sometimes, it is desired that you want to give option where a user can click a link and it will pop up a “File Download” dialogue box to the user instead of displaying actual content. This is very easy and can be achieved through HTTP header. This HTTP header is be different from the header mentioned in previous section.
For example, if you want make a FileName file downloadable from a given link, then its syntax is as follows −
#!/usr/bin/python

# HTTP Header
print "Content-Type:application/octet-stream; name = \"FileName\"\r\n";
print "Content-Disposition: attachment; filename = \"FileName\"\r\n\n";

# Actual File Content will go here.
fo = open("foo.txt", "rb")

str = fo.read();
print str

# Close opend file
fo.close()
The following are Week 1 lecture notes covering the topic regularization. These are notes for the second of five courses in the Deep Learning Specialization on DeepLearning.ai. If you want more…
— Read on towardsdatascience.com/lecture-notes-regularization-be3e7f8e7749